How to Digitize Your Photo Library with Your Phone: A Free Step-by-Step Guide
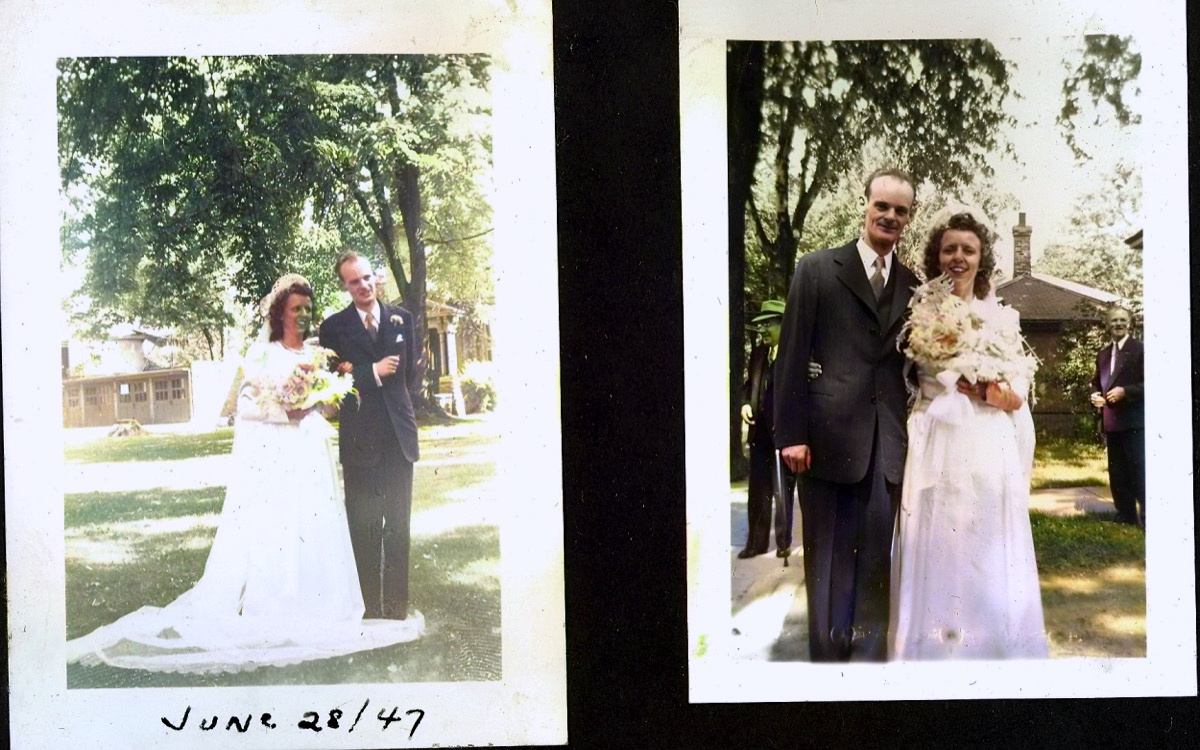
Most families have a shoebox like this: hundreds of prints, a few albums with yellowed plastic pages, and photos nobody has looked at in years. Each of them exists as a single, fading copy. If the box is damaged or lost, the photos are gone.
Digitizing used to mean a flatbed scanner and many long evenings. Today the phone in your pocket can do the job, provided the app is built for photographs rather than receipts. This guide shows a complete, realistic workflow for scanning a whole collection with the free scanner in the Recolor the Past app. You will plan the job, set up a simple scanning station, capture prints without glare, keep everything organized in albums and back it all up.
At the end, we show how to bring the best photos back to life in colour. The scanning itself costs nothing and needs no account.
What you need
- An iPhone or Android phone with the free Recolor the Past app (App Store or Google Play)
- A table near a window: daylight, but no direct sun on the photos
- A dark, matte background, such as a black T-shirt, a piece of felt or a dark tablecloth
- A soft brush or a clean microfibre cloth for dust
- Optional: cotton gloves and sticky notes for labelling boxes
Step 1: Plan the job before you scan anything
Large photo collections rarely fail because scanning is hard. They fail because the project is started all at once and never finished. Spend fifteen minutes on a plan first:
- Estimate the size. A shoebox can easily hold several hundred prints, and a family album often holds a hundred or more.
- Split the collection into batches you can finish in one sitting: one box, one album, one person or one decade. Each batch becomes one album in the app.
- Scan the most fragile photos first: fading colour prints from the 1960s to the 1980s, curled or cracked prints, and anything that has been stored somewhere damp.
- Write down what you know. Names, places and years written on the back are part of the story. Note them now, and scan the backs that carry handwriting.
Our free photo storage calculator estimates how much space the finished archive will need. The scan resolution calculator shows how much detail you need for sharing, printing or restoration.
Step 2: Set up a simple scanning station
Most bad phone scans are caused by light, not by the camera.
- Use soft, indirect daylight from the side. Ceiling lamps directly above the table reflect straight into the lens.
- Place the print on a dark, matte background. The contrast helps the scanner find the photo's edges instantly, especially for prints with white borders.
- Leave the flash off. It bounces off glossy paper. The scanner has a torch button for dim rooms, but use it sparingly with glossy prints.
- Wipe the camera lens. A single fingerprint softens every scan in the batch.
- Brush loose dust off each print. Never use water or liquid cleaners on photographs.
Step 3: Open the scanner and name your first album
Open Recolor the Past and tap Scan a photo — free on the home screen, or Scan in the Studio tab. You do not need an account to scan.
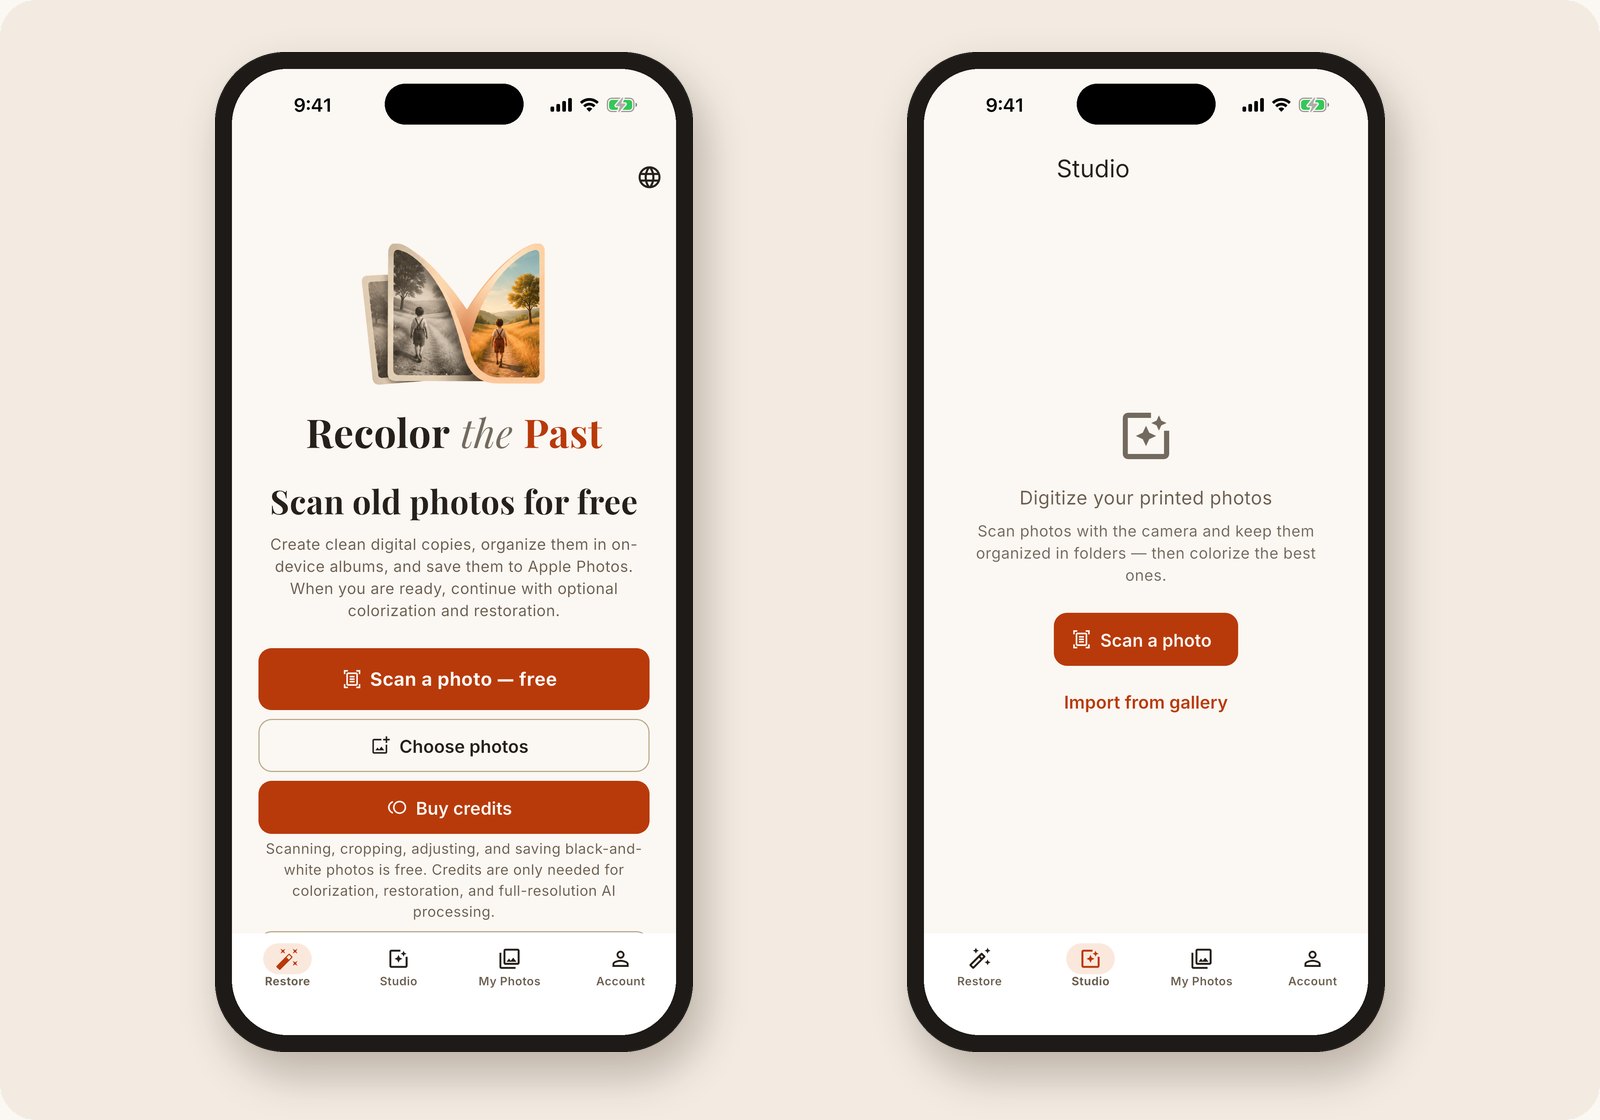
Figure 1. Start from the home screen (left) or from Studio (right). Scanning, cropping, adjusting and saving black-and-white photos are free.
Point the camera at the first print. The scanner tracks the photo's four edges in the live camera view and outlines the print on screen. When you capture the first photo, the app asks where to save it. You can pick an existing album or tap New folder. The app suggests a dated name such as "Album 2026-10-05", but naming the album after the box or event ("Grandma's box", "Wedding 1947") saves time later.
Your choice stays active for the whole session, so every following scan goes into the same album automatically.
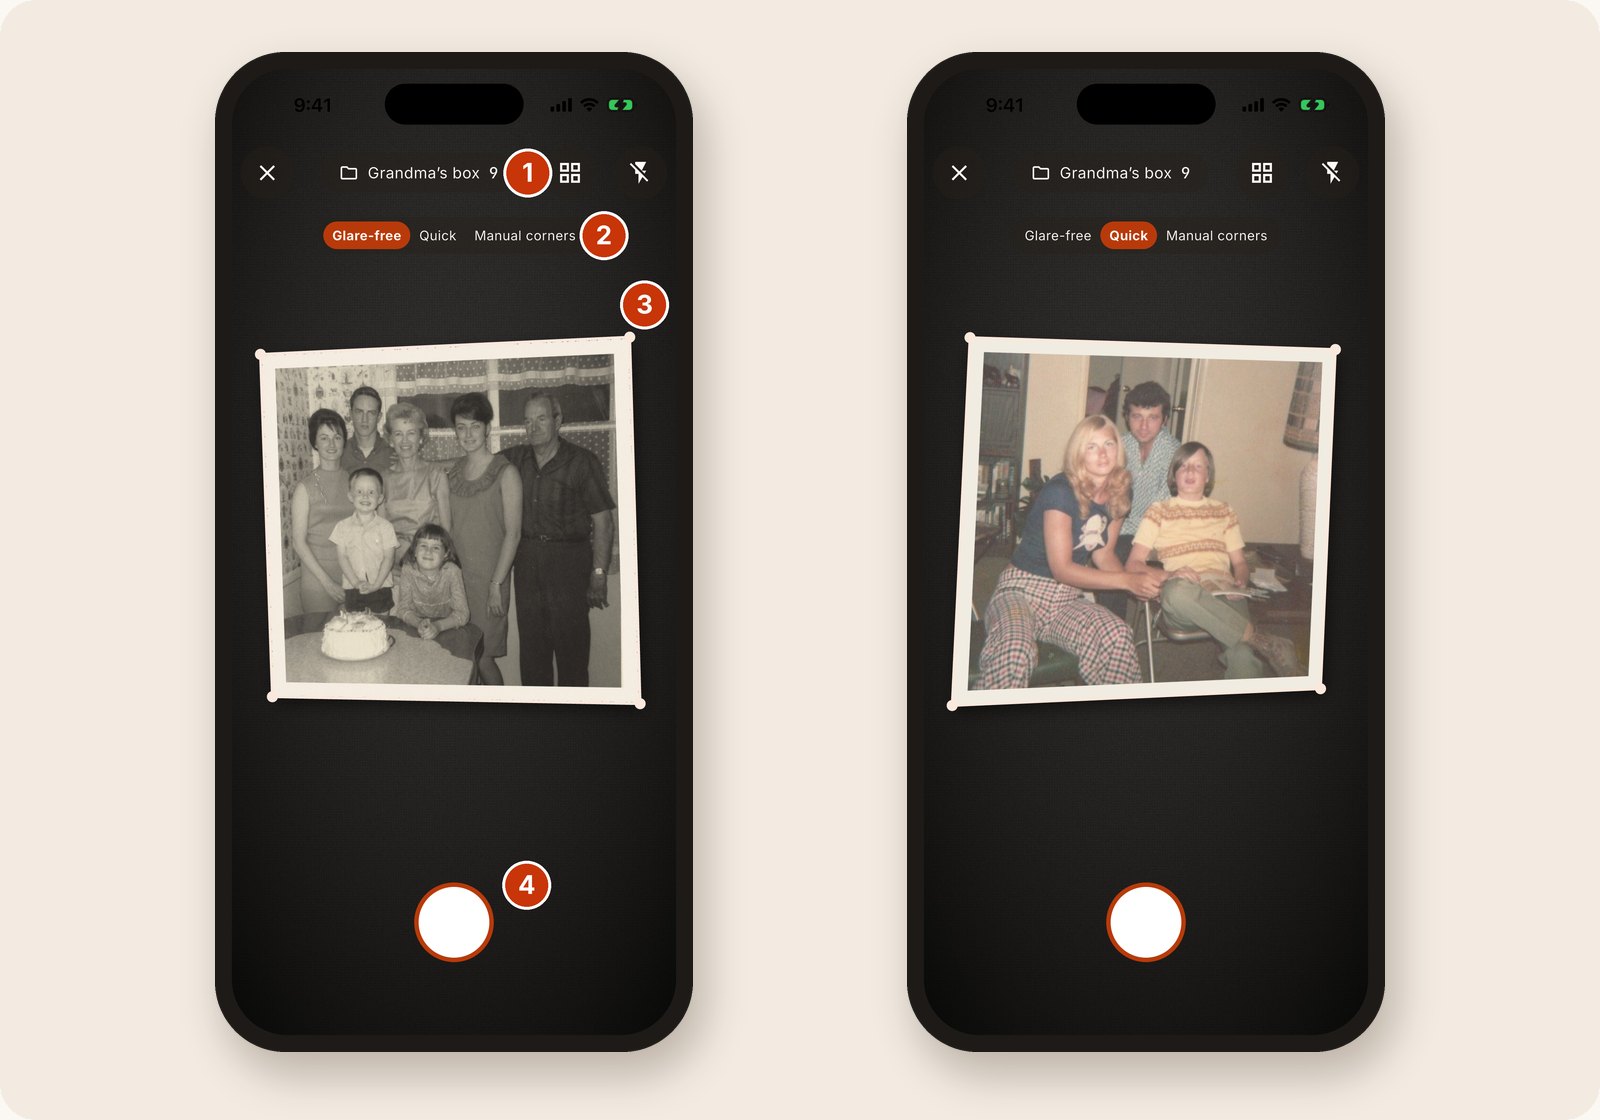
Figure 2. The live scanner: (1) the current album and its photo count, (2) the capture mode switch, (3) the detected edges of the print and (4) the shutter. The right-hand screen shows Quick mode with a faded colour print.
Step 4: Choose the right capture mode
The mode switch at the top of the scanner offers three modes on iPhone and two on Android:
| Mode | Best for | What happens |
|---|---|---|
| Glare-free (iPhone) | Glossy prints and photos that reflect light | Takes a base shot, then guides you over four dots and combines the views to remove reflections |
| Quick | Matte prints and fast batches | One tap captures a full-resolution photo, then straightens and crops it using the detected edges |
| Manual corners | Faint borders, torn corners and photos stuck to an album page | Captures the whole frame and opens the corner editor so you can place the crop yourself |
How glare-free capture works
Glossy paper reflects windows and lamps, and a reflection can wash out a face completely. The useful trick is that a reflection moves when you change the angle, while the photo stays where it is.
In Glare-free mode, tap the shutter once. Four dots appear over the photo. Tilt the phone slowly so the circle lands on each dot. When the phone is steady, the app captures that angle automatically, with a light haptic tick. After the fourth dot, the app aligns the views, keeps the cleanest detail from each and crops the result.
If you are in a hurry, tap Done after one or more angles. If the extra views cannot be aligned safely, the app keeps the base shot and tells you that the glare pass was skipped, so you know to check that scan.
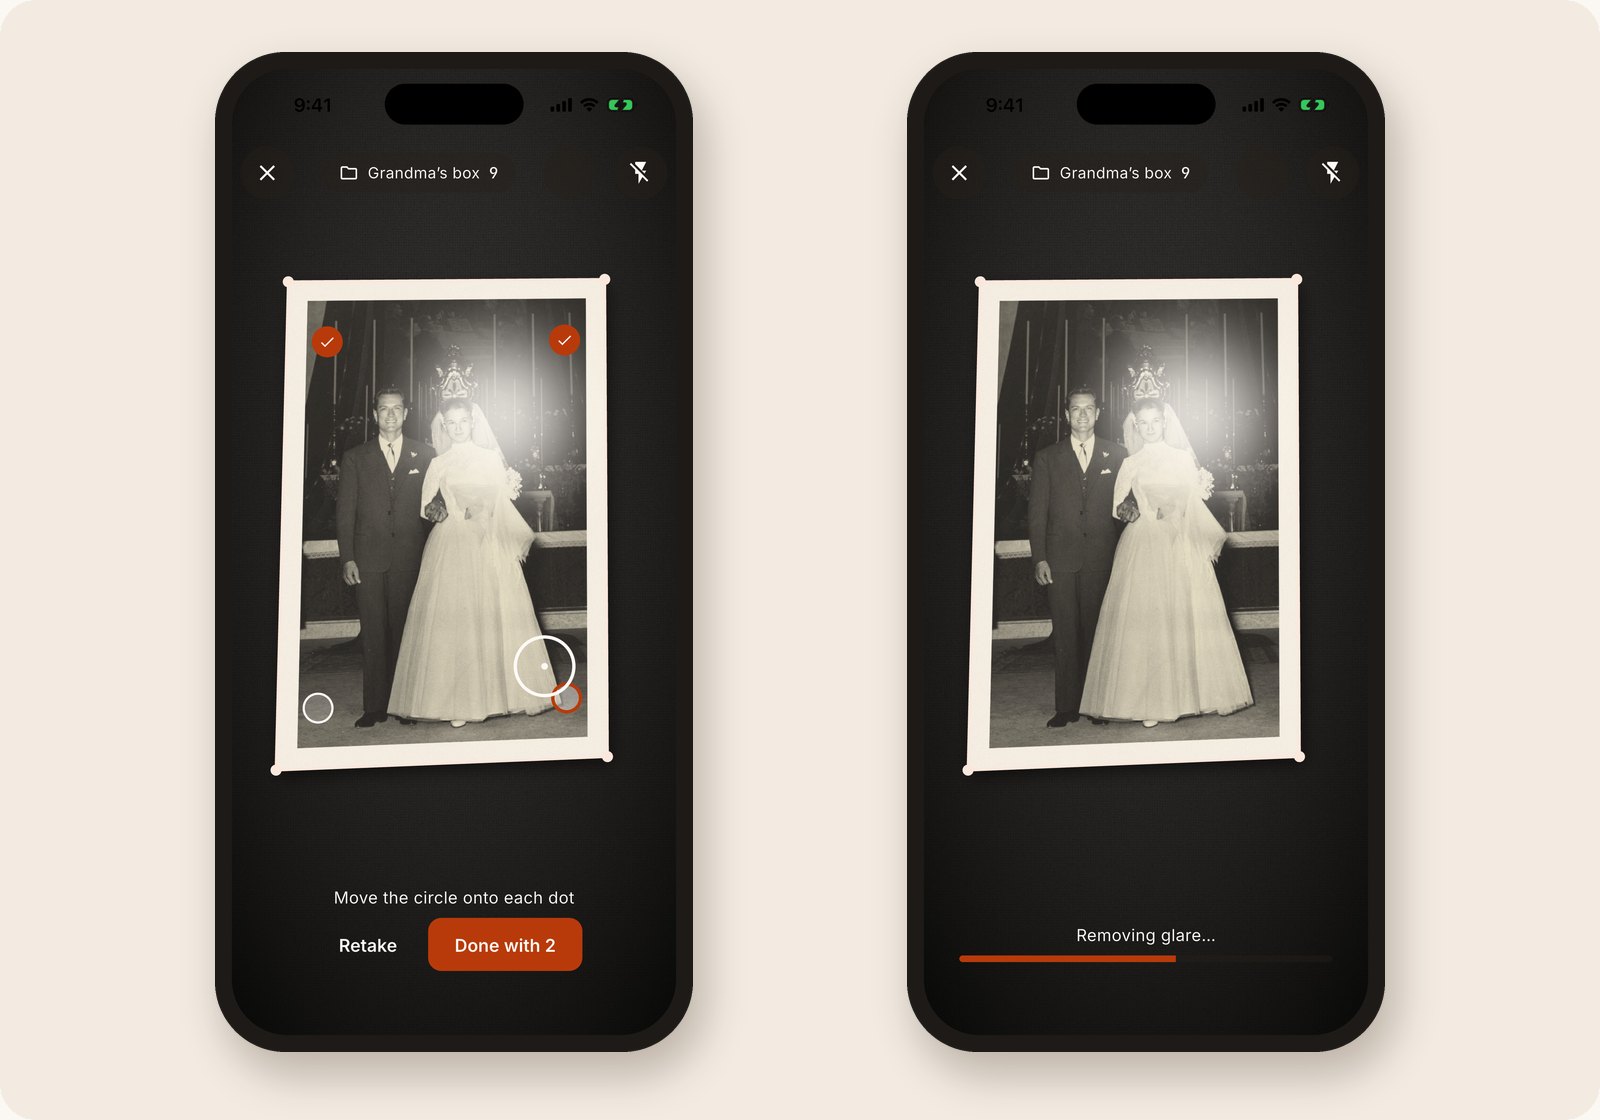
Figure 3. Glare-free mode on iPhone. Move the circle onto each dot; captured dots turn into ticks. The app then aligns the frames and removes glare.
Step 5: Scan in a steady rhythm
Scanning in a rhythm is what makes a whole library realistic. After each capture, the scanner saves the photo into your album and shows a small confirmation card, for example: Saved to "Grandma's box" (9). The camera stays live the whole time. Swap the print, wait for the outline to appear and tap the shutter again. You never leave the scanner between photos.
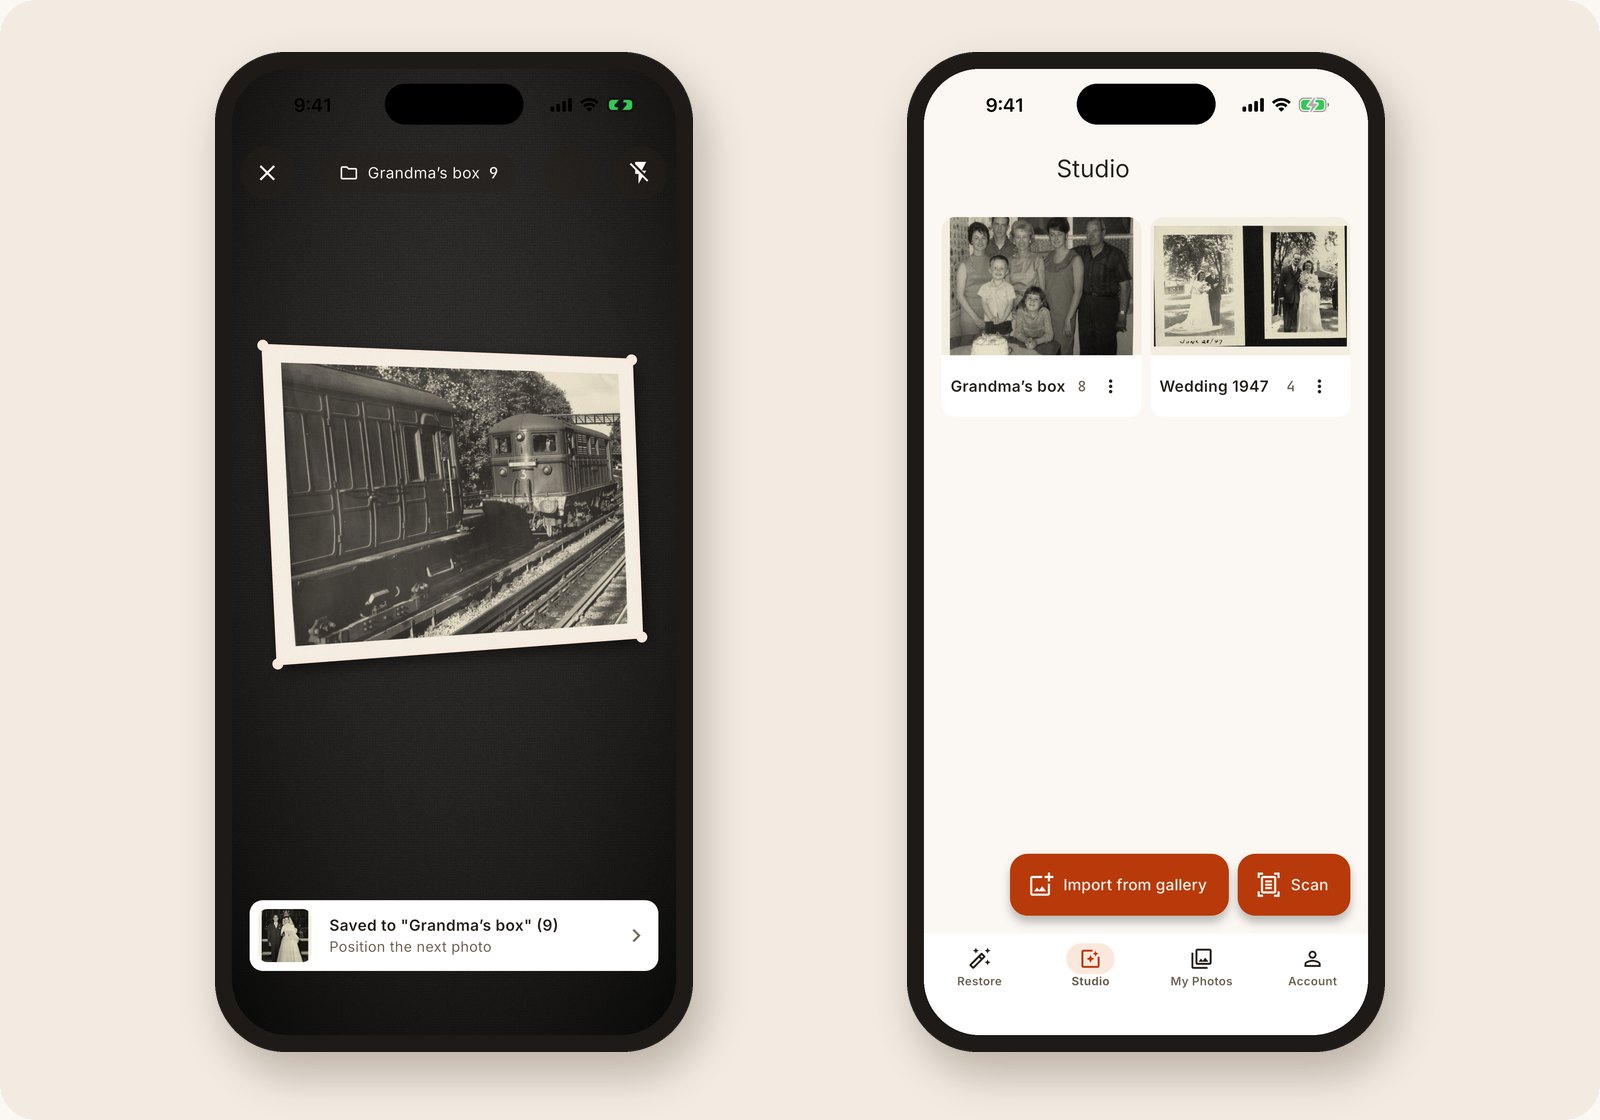
Figure 4. Every scan is saved to the current album while the camera stays ready for the next print (left). Albums then appear in Studio with their photo counts (right).
A few habits make long sessions faster:
- Tap the confirmation card if something looks wrong. It opens the scan so you can adjust the corners, rotate it or fix the exposure without ending the session.
- Scan the back right after the front when a photo carries handwriting, so both sides end up next to each other in the album.
- Tap the album name at the top of the scanner to switch albums when you move on to the next box.
- Allow access to your photo library if you want an automatic extra copy. Each scan is then also saved into a "Recolor the Past Scans" album in Apple Photos or your Android gallery.
- Use Quick mode for matte prints and save Glare-free mode for the glossy photos that need it. Quick mode is the fastest way through a large box.
Step 6: Check and fix scans in seconds
Open any scan in Studio to fine-tune it:
- Adjust corners: drag the four corners to the edges of the print. A magnifier appears under your finger for precise placement. Straighten runs automatic edge detection again.
- Rotate: turn the scan in 90° steps.
- Adjust image: use Auto tone and Auto white balance, or the sliders for exposure, contrast, saturation and warmth, with a live preview.
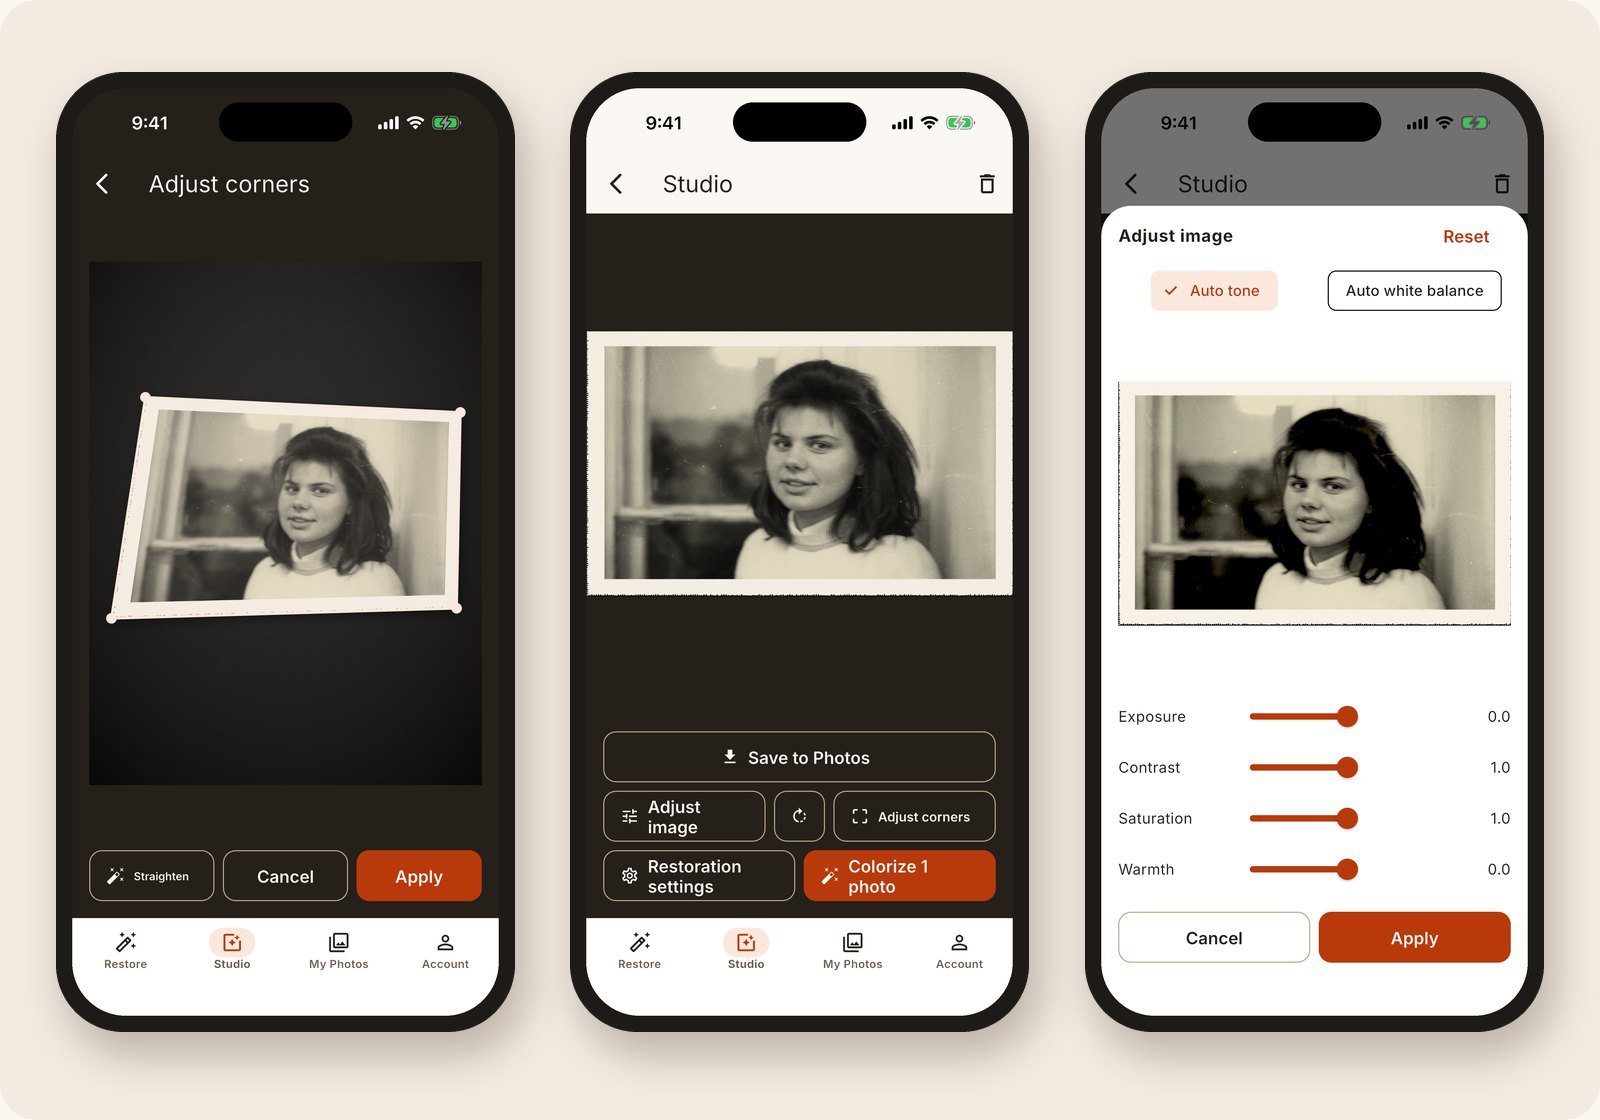
Figure 5. A print photographed at an angle (left) is flattened into a straight scan (centre). Auto tone and the sliders correct the exposure (right).
These edits run on your phone and are free. They do not invent detail. They simply make the scan a straight, well-exposed copy of the print. Keep corrections modest: the goal is an archive that looks like the photo, not like a filter.
Step 7: Organize the archive in Studio
Studio holds all your scans, grouped into albums with a cover and a photo count. You can rename and delete albums and swipe through an album full-screen, zooming in up to 8×. You can also select several scans to share them, and use Import from gallery (up to 20 photos at a time) to add photos relatives have already sent you.
A naming scheme that scales well is family or person, then event or box, then decade, for example "Ozols family, summer house, 1970s". If you export files for a family tree, our genealogy photo filename generator creates consistent names.
Step 8: Back up your scans
Scanning happens on your device, and nothing is uploaded unless you choose to restore a photo. That keeps your archive private, but it also means the backup is your responsibility. Use the 3-2-1 rule: three copies, on two different kinds of storage, with one copy kept somewhere else.
- If you allowed access to your photo library, your scans are also in Apple Photos or your gallery. Check that iCloud Photos or Google Photos backup is switched on, so these copies are backed up with the rest of your library.
- After each finished box, copy the album to a computer or an external drive.
- Keep the original prints too, somewhere cool, dry and dark. Our photo preservation checklist covers storage in more detail.
Step 9: Bring your favourite photos back to life
Once the archive is safe, the fun part begins. Every family box has a handful of photos that deserve more than a faithful scan: a wedding portrait, a grandparent as a child, a faded summer snapshot from the seventies.
Open an album in Studio, long-press to select the photos you love and tap Colorize. Free previews start straight away, and each one usually takes about a minute. Open Restoration settings to choose what each photo needs:
- Colorize adds natural colour to black-and-white and sepia photos.
- Recolorize refreshes faded colour prints, such as the magenta cast typical of 1970s snapshots.
- Improve faces and Advanced options (scratch repair, sharpening, red-eye removal, upscaling and more) handle damage and soft detail. These options need a free account.
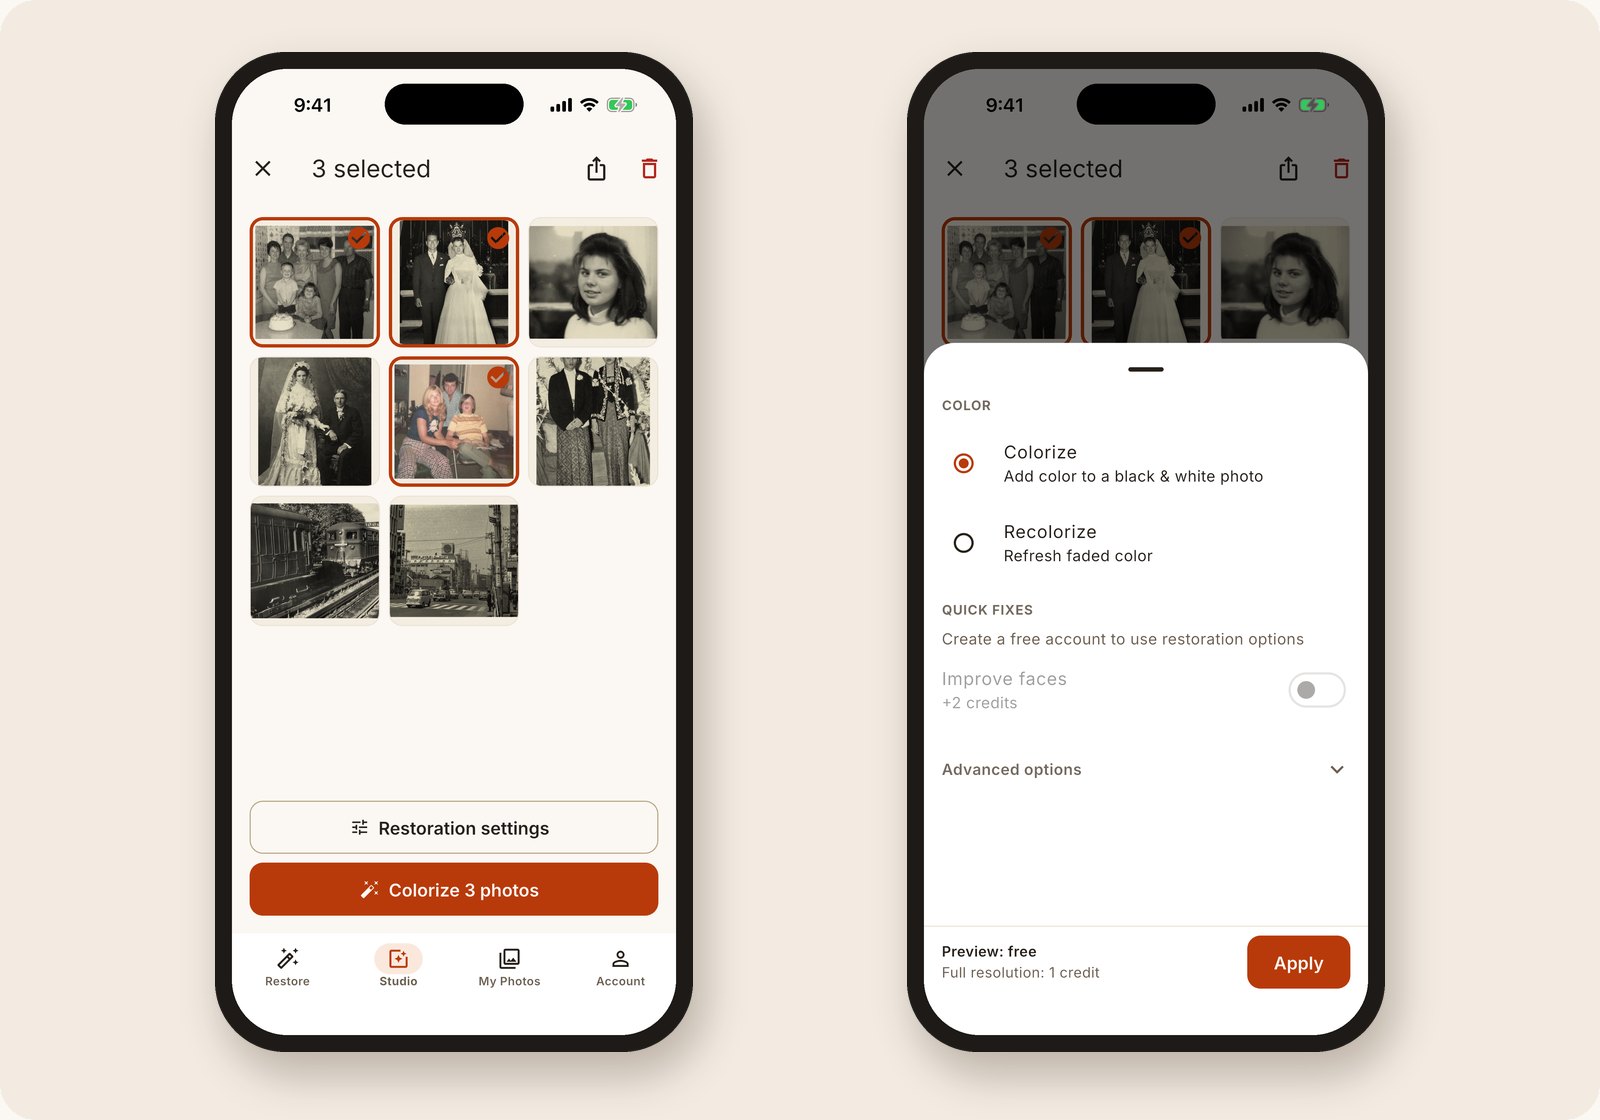
Figure 6. Select the photos you want to restore (left), then choose the colour and repair options. The panel shows that the preview is free and how many credits the full-resolution result costs (right).
Drag the slider to compare the original with the result. Previews are free and watermarked. You pay only when you want the full-resolution file. Basic colourization costs one credit; extra repairs add a little, and the app always shows the total before you confirm.
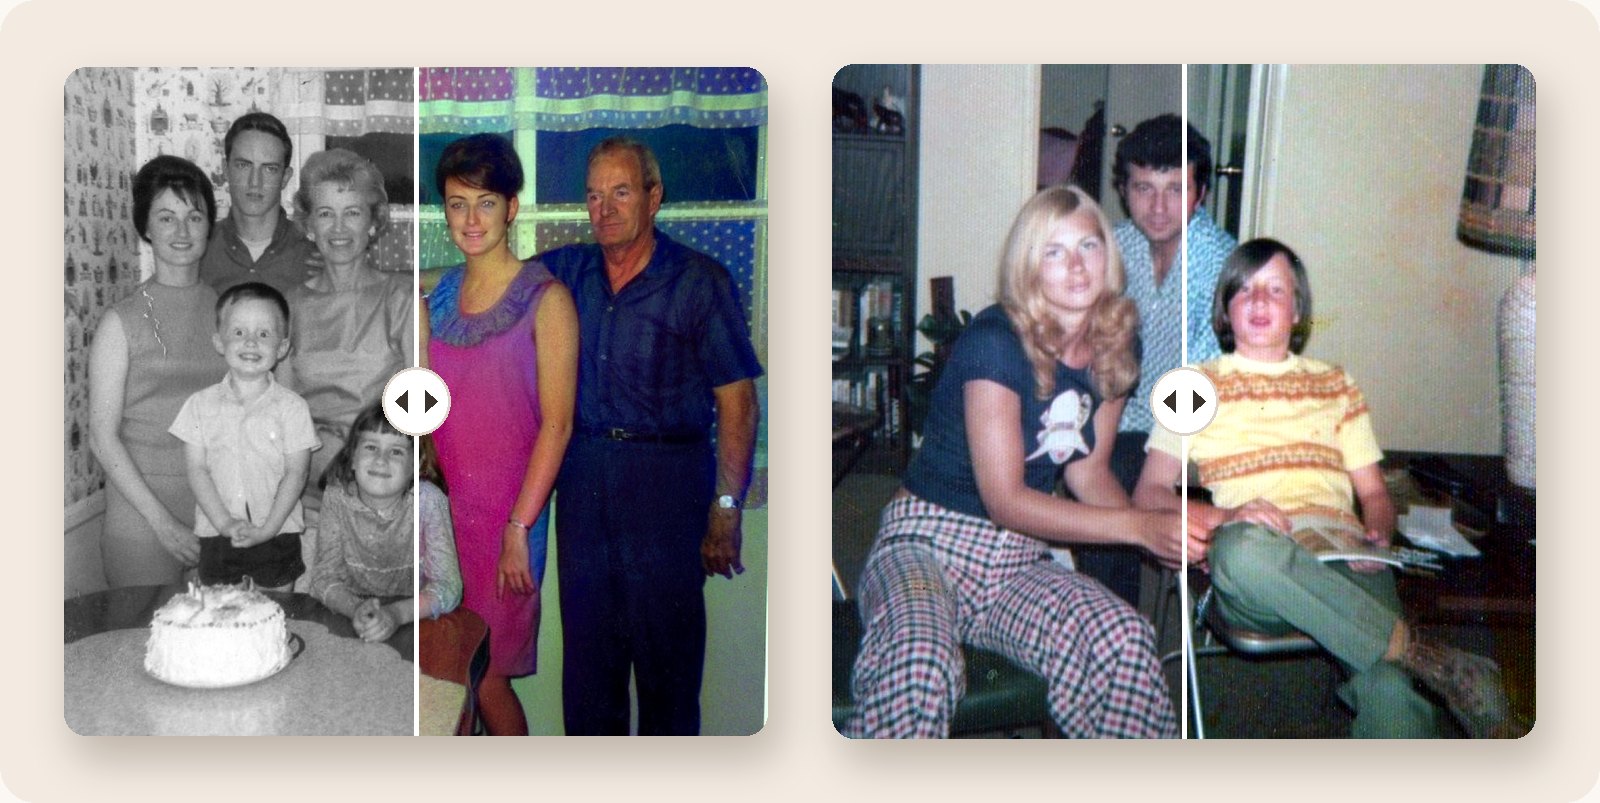
Figure 7. Colorize turns a black-and-white family photo into colour (left). Recolorize brings back the colour of a faded 1970s print (right).
What does it cost?
- Your first preview needs no account. A free account adds three more previews and one free full-resolution photo.
- Credit packs on the website start at €2.99 for 25 credits. App store prices can differ by region.
- The Pro plan includes 350 credits a month for €14.99. It suits a big archive you want to restore over time. See pricing for the current options.
A note on honesty: AI colourization is a believable interpretation, not a record of the original colours. That is why Recolor the Past never overwrites your scan. The restored version is saved separately in My Photos, and you can save it to a "Recolor the Past" album in your gallery. The original scan stays untouched in Studio. Your photos are never used to train AI.
Quick answers
Is the scanner really free? Yes. Scanning, corner correction, image adjustments, albums and saving to your photo library are free, and you do not need an account. Credits are needed only for full-resolution AI colourization and restoration.
Is a phone as good as a flatbed scanner? For standard prints, a well-lit phone scan is good enough for sharing, family trees and colourization. A flatbed scanner still wins for very small prints and archival master copies. Our scanning tips compare the options.
Can I scan negatives or slides? The scanner is designed for prints. Use a film scanner or a professional lab for negatives and slides.
Do I have to take photos out of the album? Not if the page lies flat. On iPhone, Glare-free mode helps with photos behind plastic sleeves. Manual corners lets you crop a photo that is stuck to the page. Never force old prints off sticky "magnetic" album pages, because they tear easily.
Are my photos uploaded when I scan? No. Scanning and editing happen on your phone. A photo is uploaded only when you start a restoration preview.
What is the difference between iPhone and Android? Both have live edge detection, Quick and Manual corners modes, albums and gallery saving. Glare-free multi-angle capture is currently available on iPhone.
Start with one box
You do not need to digitize everything this month. Pick one box or one album this weekend, scan it into its own album and back it up. Once the memories are safe, choose your three favourite photos and see them in colour. The first preview is on us.
More from the blog
From Print to Pixels to Colour: How Photo Digitization Changed—and How Recolor the Past Works Today
Photo digitization once required specialist copy cameras, flatbed scanners and a desktop workflow. See how today’s options compare—and how Recolor the Past combines free scanning, perspective correction and optional AI colourization.
Recolor the Past App: From a Printed Photo to a Restored Family Album
A complete guide to scanning or importing photos, preparing them in Studio, creating free previews, choosing restoration options and keeping full-resolution results organized.
Prepare, Then Restore: Every Photo Option Explained
Learn which corrections you make locally in Studio and which optional restoration processes create the final result.